Proprietary Company & Employees
In This Topic...
Proprietary companies are non-licensee business partners that you conduct business with. In order to attach these companies to your policies via the system you set them up in the Company section as "proprietary" companies in the application. You can then associate each company within your hierarchy to the proprietary company in order to associate these proprietary partners to your policies in the system.
Managing a Proprietary Company
In Proprietary Company & Employees, users can create and manage a proprietary partner company. Each proprietary company consists of a single office. You can add users under the various proprietary companies, view the list of policies each company is associated to as well as the list of relationships each proprietary company has to the various licensee companies that belong to the licensee owner organization.
Searching for a Proprietary Company
Locate individual companies to manage.
Why would I search for a proprietary company?
To view or modify the details of a company or its employees.
Before Getting Started
- You are assigned the Manage Company Associations security right.
- You are logged in as an employee of the licensee organization that owns the proprietary company you are searching for; you cannot manage proprietary company details if you do not belong to the licensee organization.
Steps
- Select Administration from the main menu. The system displays the Administration landing page.
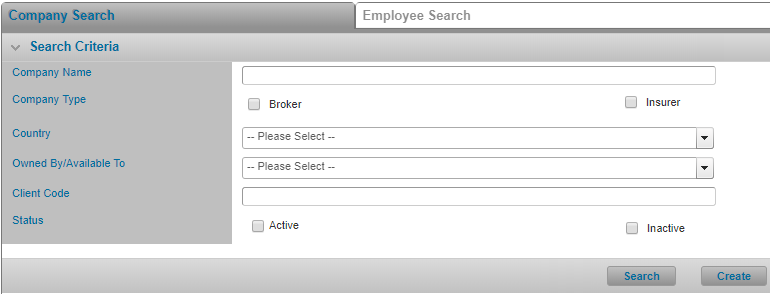
- Under the Company & Security menu, click Proprietary Company & Employees. The system displays the Company Search screen.
-
Click the Employee Search tab. The system displays the Employee Search screen.
-
Optionally, enter some filter criteria in order to limit the available proprietary companies.
Tip: To search for inactive companies check the Inactive checkbox. You can uncheck the Active checkbox if you want the system to only return deactivated companies.
- Click Search. The system searches for the proprietary company records within your administrative scope that match all of the search parameters you entered and displays a list of companies.
-
Click the Company Name hyperlink for the company you wish to view or manage, or refine your query criteria to search again if the results do not include the company you were looking for.
Tip: You can easily access and view employee details for a specific employee by clicking on the hyperlink in the Number of Employees column for any available proprietary company included the Company Search Results list.
Result
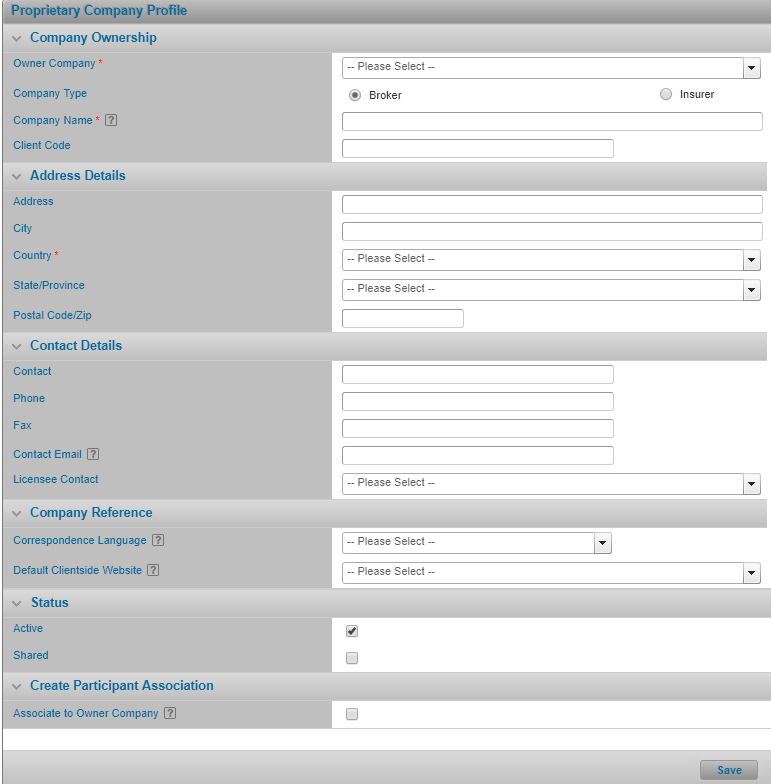
The system displays the selected company’s Proprietary Company Profile screen and you can navigate through the company and associated employee screens as required.
Creating a Proprietary Company
Why would I create a proprietary company?
In order to associate partner (non-licensee) companies to the polices managed in the system.
Before Getting Started
- You are assigned the Manage Company Associations security right.
- You are logged in as an employee of the licensee organization that owns the proprietary company; you cannot manage company details if you do not belong to the owner organization.
Steps
- Select Administration from the main menu. The system displays the Administration landing page.
- Under the Company & Security menu, click Proprietary Company & Employees.
-
The system displays the Company Search screen which includes all of the companies in the organization. Click Create at the bottom of the screen. The system displays the Proprietary Company Profile screen.
-
Select the Owner Company, the licensee company which will own the proprietary company in the system.
Note that the Owner Company can only be changed to another company that is higher in the hierarchy than the current Owner Company, and only when the company profile is marked as Shared.
-
Complete, at minimum, all of the required fields. Fields marked with a red asterisk * are required.
Tip: Ensure the company name is unique. It is best practice to include some address details in the company name to better identify the company throughout the application; for example: when creating assureds, printing certificates and generating reports.
Tip: If you wish to associate the proprietary company to one or more licensee companies in your organization at the same time as creating the company in the system, check the company’s Shared checkbox and then under the Create Participant Association panel, check the Associate to Owner Company field. See Creating a Licensee Company Relationship for more details.
- Click Save.
Result
The system confirms the company has been added and populates the company header with the company name. Then the system enables the Proprietary Company and Employee side menu options so you can manage other details for the newly created company.
Note: You cannot build a hierarchy in the system to represent a proprietary company organization. In the system, each proprietary company can only be made up of one office. There are no subsidiary companies.
Modifying a Proprietary Company
Why would I modify a proprietary company?
The company information has changed or is inaccurate.
Before Getting Started
- You are assigned the Manage Company Association security right.
- You are logged in as an employee of the licensee organization that owns the proprietary company you wish to modify; you cannot manage proprietary company details if you do not belong to the licensee organization.
- There is at least one proprietary company already created.
Steps
-
Search for the proprietary company you wish to modify.
- Modify the values for any field as required.
- Click Save.
Result
The system saves your changes.
Deactivating a Proprietary Company
Why would I deactivate a proprietary company?
The company is no longer valid, either the company has closed or been sold and is no longer a partner.
Before Getting Started
- You are assigned the Manage Company Association security right.
- You are logged in as an employee of the licensee organization that owns the proprietary company you wish to deactivate; you cannot manage proprietary company details if you do not belong to the licensee organization.
- There is at least one proprietary company already created.
- You deactivated any employees associated to the company.
Steps
-
Search for the proprietary company you wish to deactivate.
-
Uncheck the Active field at the bottom of the Proprietary Company Profile screen.
- Click Save.
Result
The proprietary company’s status is updated to Inactive.
Note: If you want to ensure the proprietary company can no longer be attached to any new policies you must deactivate all company associations for the selected company.
When you deactivate a company that has employees associated to it, the employees are not automatically deactivated. If you no longer want the company’s users to log into the system you will need to manually update the status of each employee associated to the particular company.


